Intaglio

Etching Process with Kathryn Anderson

Professional printmaker and printmaking tutor Kathryn Anderson takes us through the print process she uses when printing her etchings.  Kathryn is an ambassador for Somerset paper and is known for her highly detailed prints capturing the beauty and mystery of the natural world.

ABOUT ETCHING (Intaglio)

Intaglio is the opposite of relief printing. I always think of it this way: Etchings print what’s BENEATH the surface and relief prints print what is ON the surface.

Creating etchings is a very old technique. They were first produced around 1500. Some of the great etchers include Durer, Rembrandt, Goya, Degas, Picasso, Matisse and so many more!

An etching is created by incising lines on a metal plate with a corrosive solution and then applying ink to the plate. The ink is pushed into the lines and the surface is wiped clean. Dampened paper is then laid on top of the plate and passed through an etching press under great pressure which pushes the paper into the incised lines and transfers the ink to the paper.

Let’s look a bit deeper into the process!

DRAWING UP YOUR DESIGN

Create your imagery to fit your copper plate. Once you’ve established your design, it can be drawn directly or transferred to the prepared copper plate.

PREPARING THE PLATE

I use copper plates for my etchings. Here are the steps to get it ready to image:

  1. Use standard sized plates or cut the copper plate to the size you want. (I use a coping saw)

  2. File the edges to a nice 45 degree (ish) bevel on top and sand smooth. (So you don’t trap ink there or cut your paper, or press blankets, or yourself!)

  3. Lightly sand the surface to erase small scratches and make the surface very smooth.

  4. Polish the surface of the plate (using metal polish) and de-grease with whiting and vinegar.

Now your plate is ready to be imaged!

CREATING LINEWORK

In this step we will create linework and etch the copper plate with Ferric Chloride.

There are different ways to do this, but this is what I do.

  1. Make sure your plate is clean and free from oil.

  2. Apply a ‘ground” which resists the Ferric Chloride. I prefer hard ground for fine lines.

  3. Draw your lines with an etching needle through the hard ground to expose the copper.

  4. Cover the back with an acid resist that doesn’t scratch off, either varnish or adhesive backed shelf liner.

  5. Submerge your plate in Ferric Chloride to etch the plate. The length of time in the Ferric will determines the depth of the line. Deeper lines hold more ink and print darker.

  6. Remove the plate and clean the ground off with mineral spirits.

You’re ready to pull your first print!

PRINTING THE ETCHED PLATE

The first step is to print a proof of your etched linework plate.

  1. Apply etching ink to the etched plate surface and work it into the lines. A matboard tab can be used to spread the ink and remove the excess.

  2. With a combination of wiping with stiff cheesecloth (Tarlatan or other wiping fabrics) and newsprint paper the surface ink is removed leaving the incised lines with ink. You can also choose to leave a thin layer of ink to create tone.

  3. Don’t forget to clean those beveled edges!

  4. Place the copper plate ink side up on the etching press.

  5. Blot your dampened paper and lay it on the plate.

  6. Put a sheet of newsprint on top and roll down the felt etching blankets. There are three blankets on an etching press: the sizing catcher, the cushion, and the pusher on top.

  7. Engage the press to apply pressure to the paper covered plate. This pressure will push the dampened paper into the plate and transfer the ink to the paper. The pressure will also create a “Plate-mark” which is the hallmark sign of an etching.

  8. Gently lift the blankets and newsprint and carefully lift the paper off the plate.

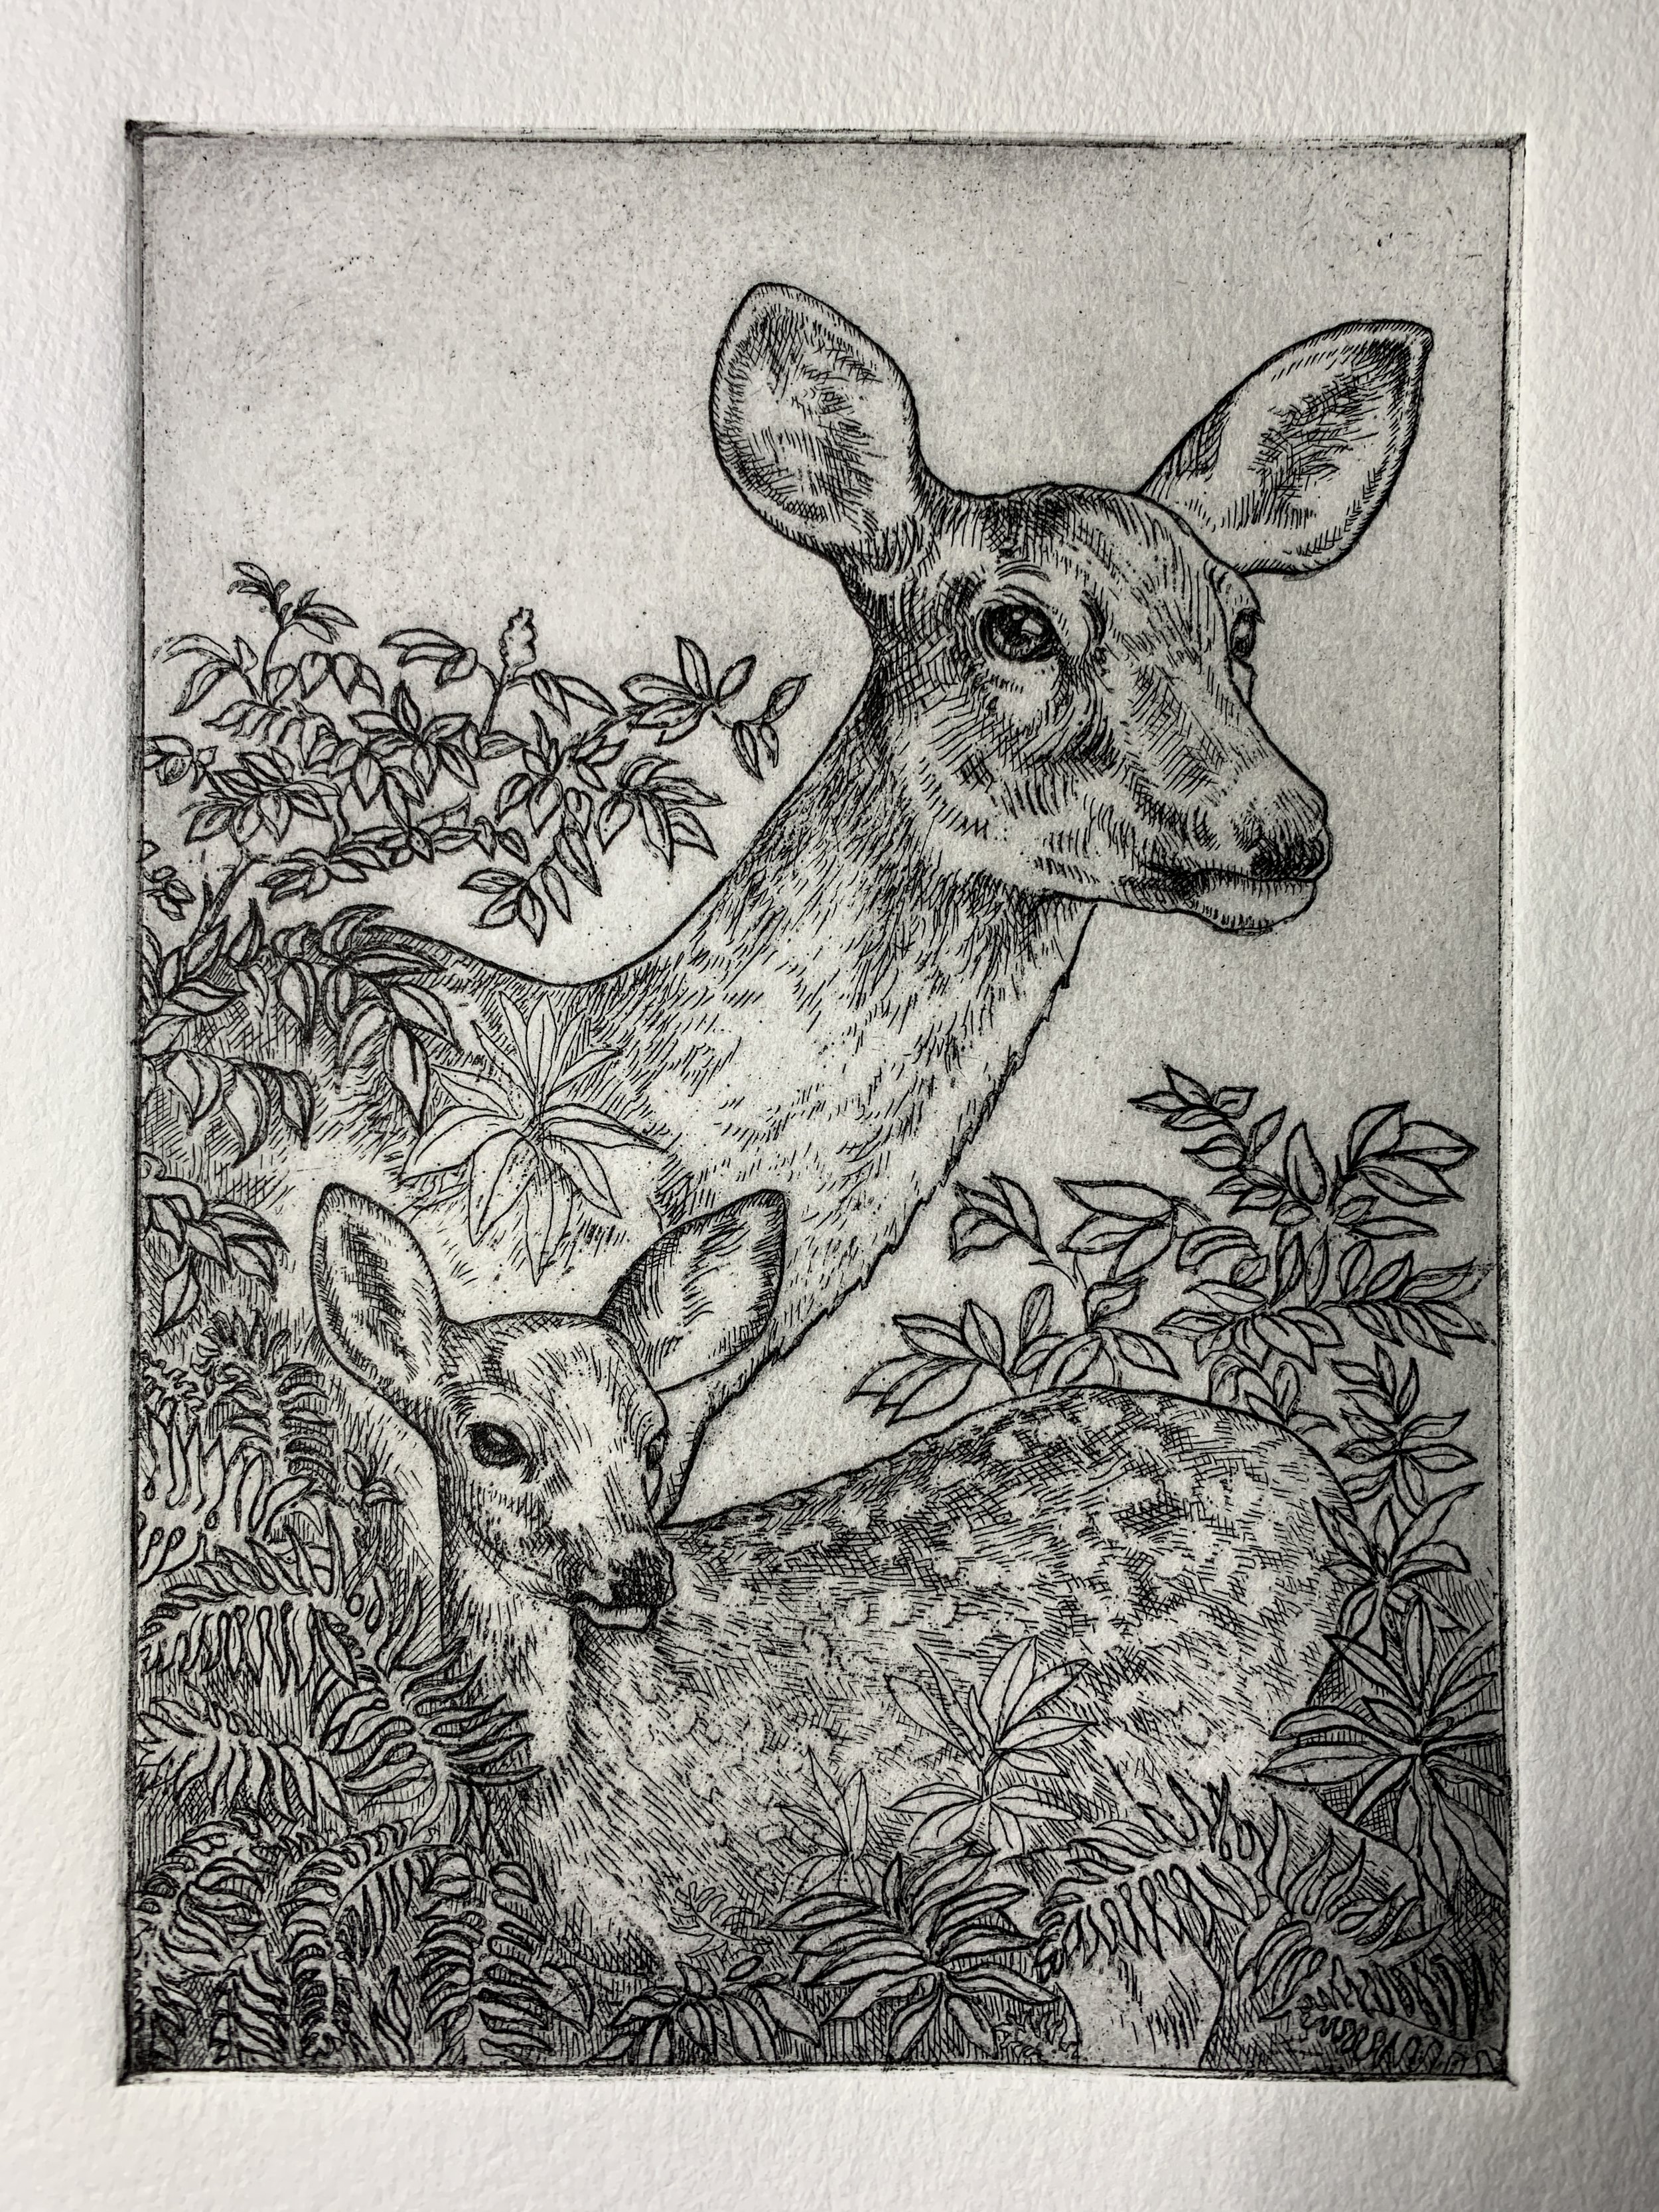
VOILA!! You have your first proof!

At this point I decide what comes next. Do I like the line proof as is, or do I want to add tonal values?

CREATING TONAL VALUES

There are lots of ways to create tonal values on your plate, my favorite is Aquatint.

Aquatint is an etching process that creates a texture that is etched into the plate to hold ink. It can be done with traditional powdered rosin or with the more recent method of spray paint. I use rosin

(Note Rosin can be hazardous if inhaled, so always wear gloves, mask, and eye protection when using)

  1. Clean and degrease the line-etched plate

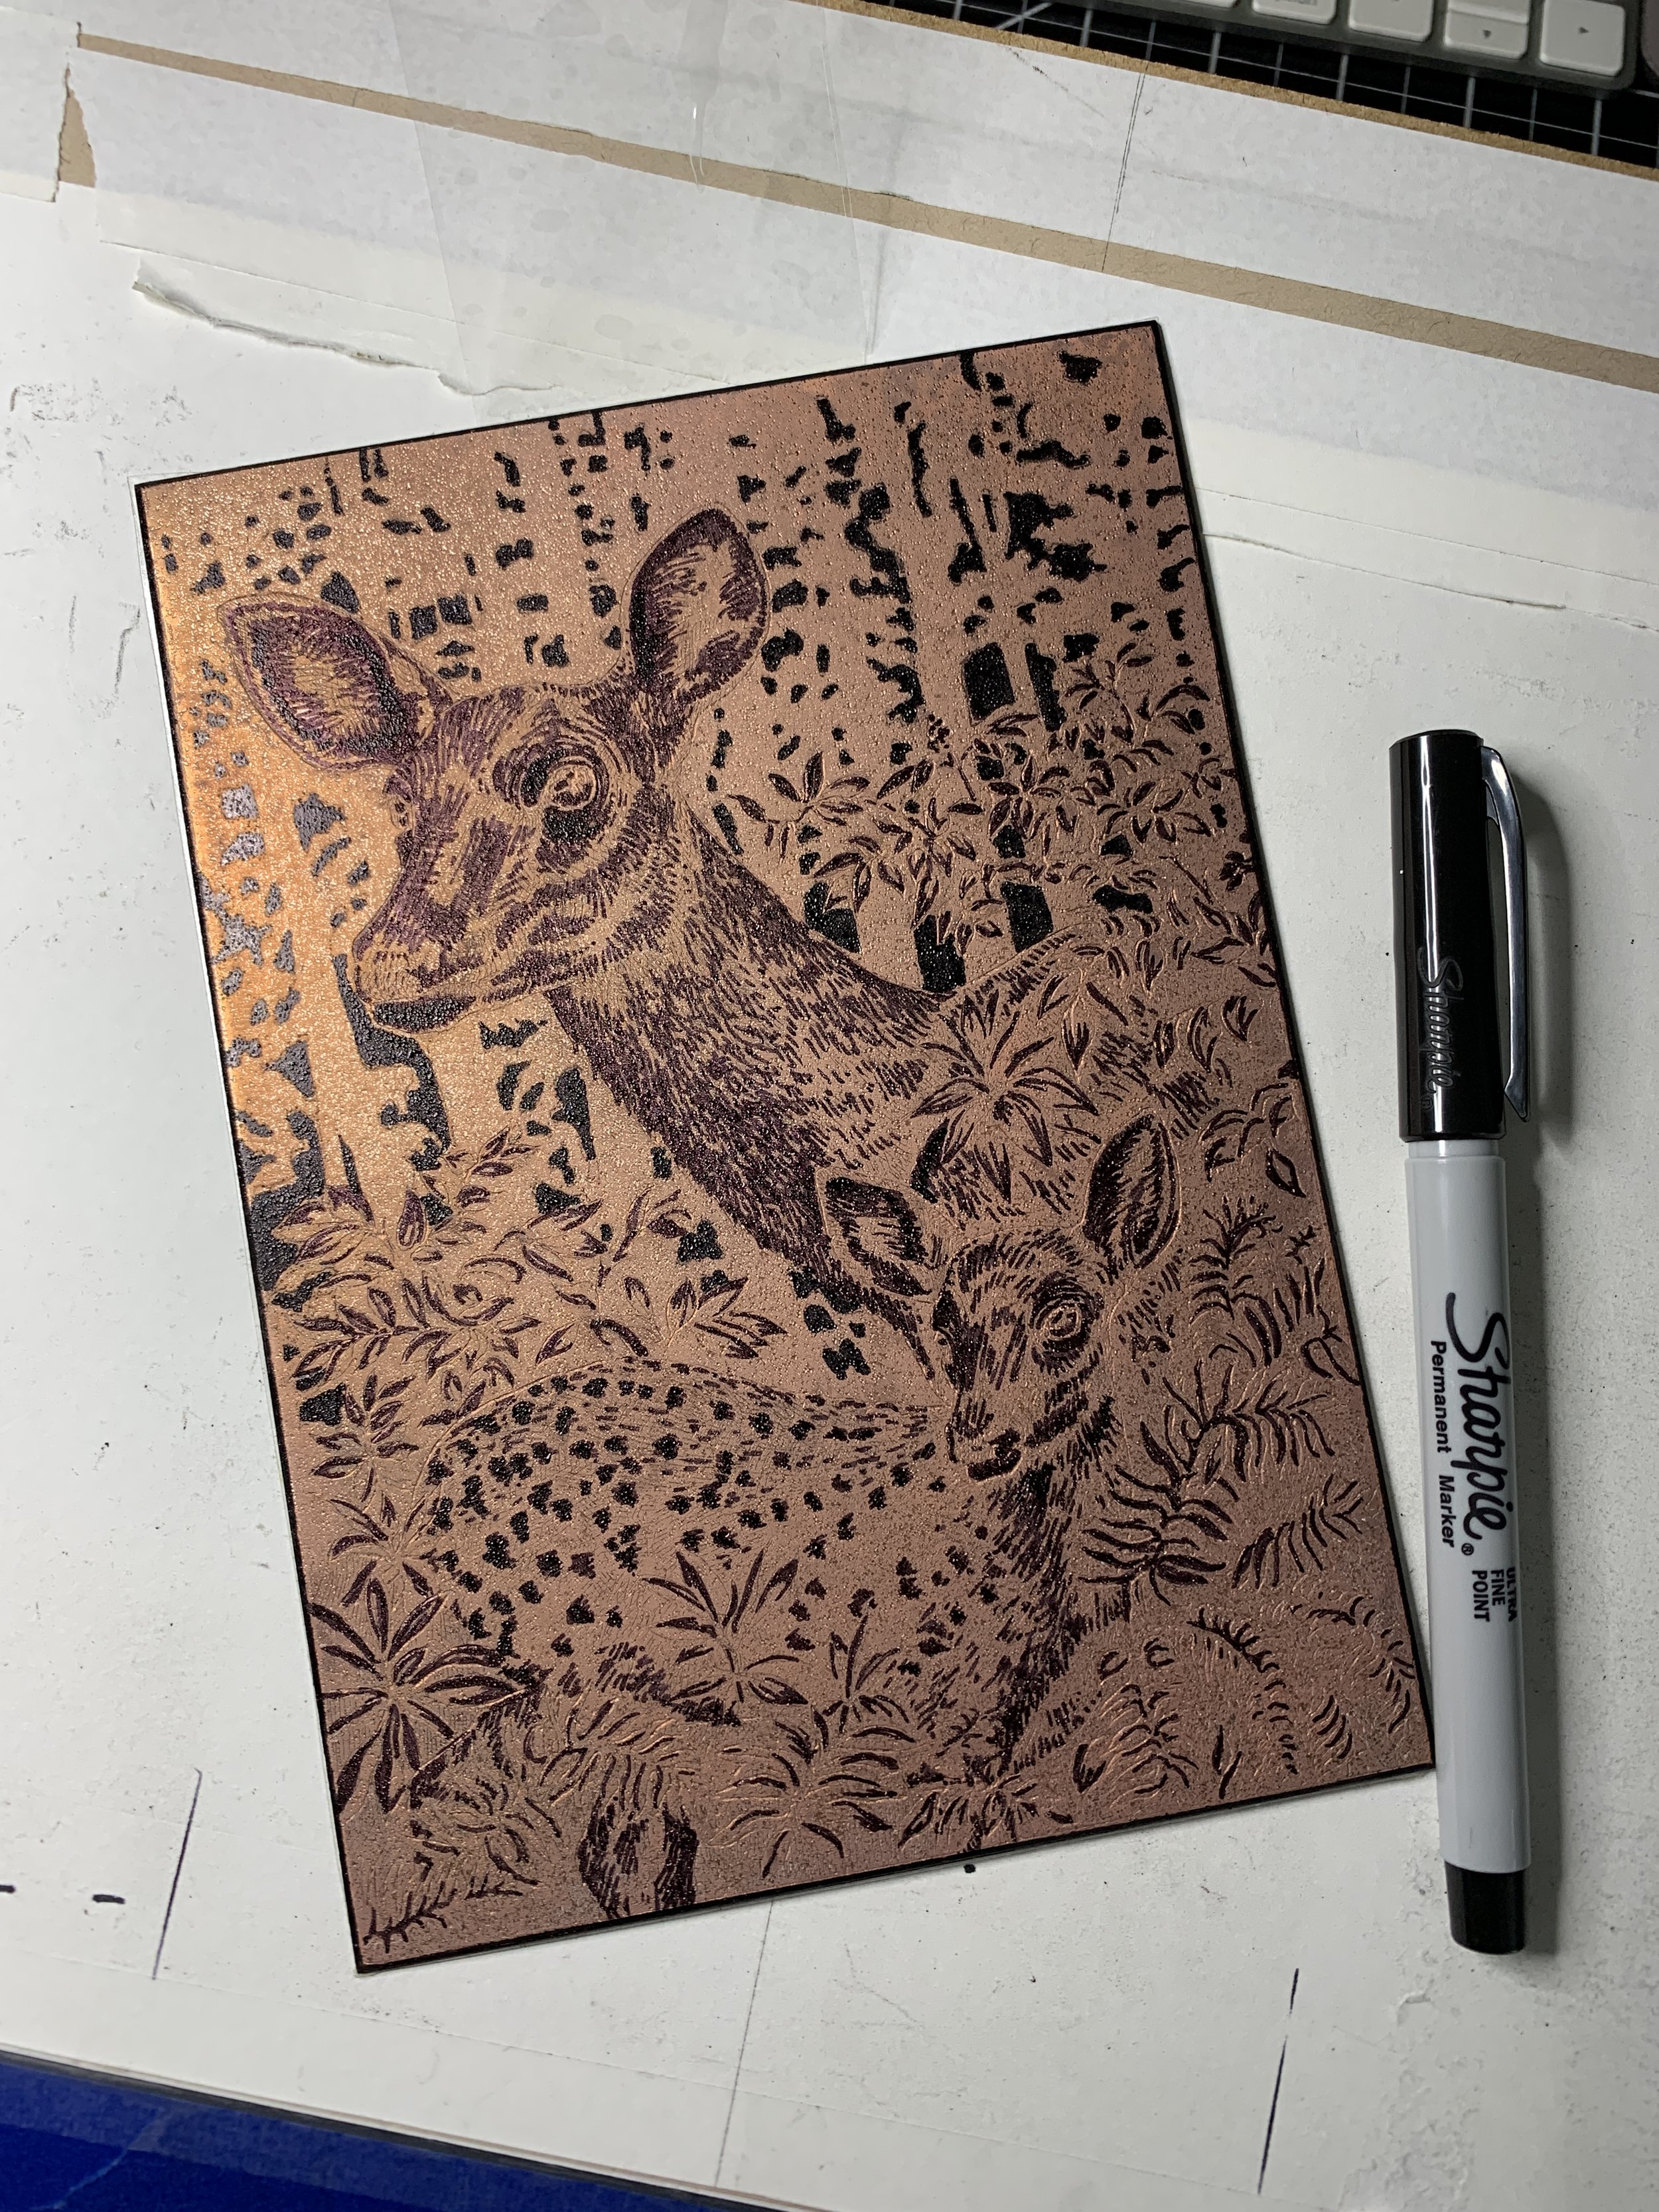
  2. Apply powdered rosin to the surface and heat until it begins to melt and adhere to the plate.

  3. The tiny dots are resistant to the Ferric and create a texture that holds ink. The longer you submerge the plate the deeper the etch and thus the amount of ink it holds.

  4. A series of tonal values can be achieved by blocking of the lightest value on the plate (I like permanent Markers of varnish) and dipping in the Ferric for a short time. After the plate is removed from the Ferric you can block out the next area of lighter tone and etch it again. You can do this for multiple times to create a full range of values. (Note: It is VERY important to run a test plate to better understand the timing of the etch and the resulting tonal value.)

  5. After you have finished creating your tonal values you need to remove the aquatint (Soaking in denatured alcohol works well) and you are ready to print!
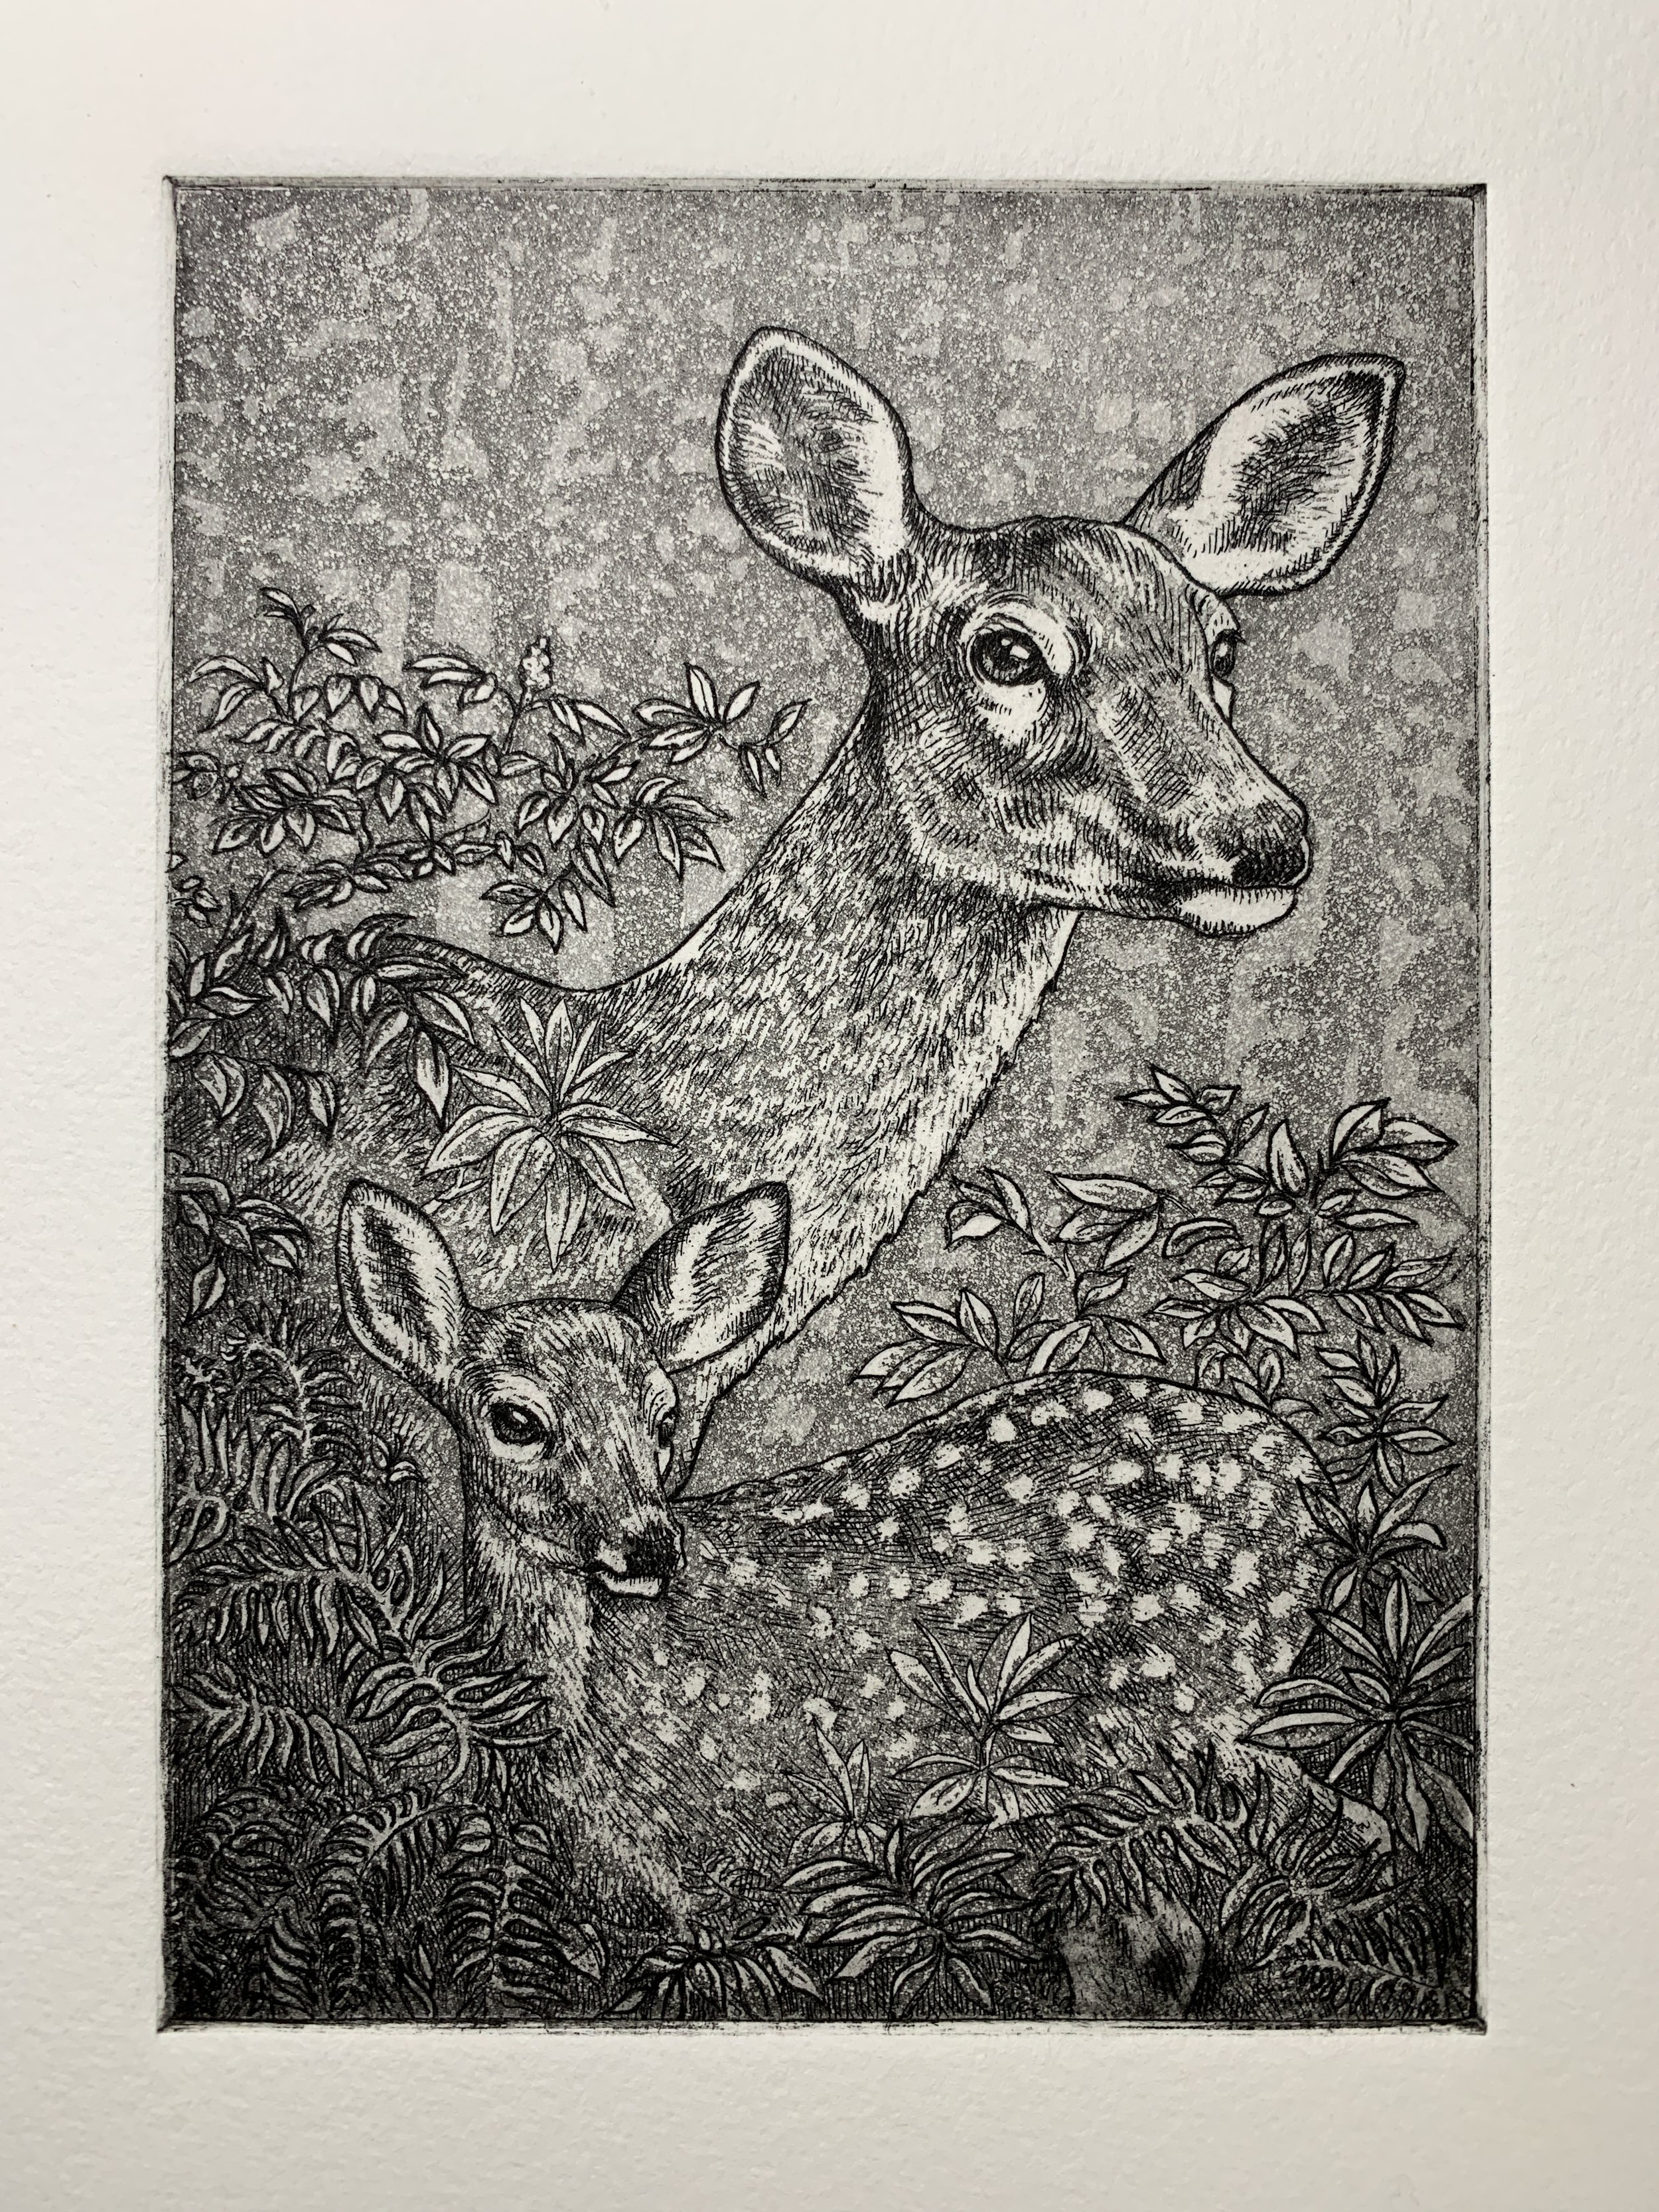
THE BIG REVEAL!!

Ink up your plate and print as you do with the line etching. VOILA! Your beautiful etching!

There are other methods of creating intaglio work including drypoint, mezzotint, photogravure, heliogravure, and engraving.

AN IMPORTANT NOTE ABOUT PAPER

It’s very important to use the right paper. Etching paper needs to be soaked in water for at least 30 minutes (depending on paper type) and gently blotted just before printing.

Etching paper must be soft but strong under pressure.

My favorite Somerset Paper for etching is Somerset Textured. It comes in cream, white, and softwhite and prints BEAUTIFULLY! It has just the right amount of sizing and prints wonderfully on even the most delicate images. Somerset Velvet is another excellent choice for very fine work with its smoother texture.

IN CLOSING

Etching is a challenging and extremely rewarding printmaking method. I have to admit, it’s my favorite medium for creating prints. (I love a challenge!)

There are lots of variables in this process, but using the best papers takes some of the guesswork out of the equation and makes printing a joy!

For the Love of Art: Behind the Scenes with Anthony Kirk

Artist, lecturer, exhibition curator and master intaglio printer, Anthony Kirk demonstrates the printing of etchings, aquatints and engravings on Somerset paper as well as the preparation of the printmaking paper for intaglio printing. On view in the print studio are examples of his past collaborations with Wolf Kahn, Robert Kipniss, Helen Frankenthaler, Joan Mitchell, Kiki Smith, Frank Stella and Donald Sultan. The technique of etching and printing a copper plate is unchanged since Rembrandt's time yet this ancient process continues to be a significant part of the education of an art student as well as being an important medium in the work of emerging artists and artists of international acclaim.

Below are some follow up questions from Tony’s webinar.

How many pounds of pressure are your roller using?

I have no idea how many pounds of pressure the roller of the press is bearing down when I print. Unlike a hydraulic press, which I used frequently at Tyler Graphics and has a pressure gauge. Except for the very smallest table mounted presses which usually come without micro dials at each side of the roller, nearly all larger hand operated and electric driven presses have micro dial pressure gauges at each side of the roller so that visually one can visually see that the pressure is equal on both sides. The turn handles on each side turn to the right to increase the pressure and to the left to decrease the pressure. Righty tighty and lefty loosey.

There are several variable that have to be just right in order to print an excellent impression. The correct number of blankets is very important. If the catching sizer which is closest to the paper become stiff from absorbing the paper's sizing over time, it will not give you a good print in the lightest aquatints for example. This blanket needs to be hand washed once in a while. The paper has to be sufficiently dampened. Somerset if soaked in water for ten to fifteen minutes is sufficient. Then the paper is blotted to remove all signs of wetness. During the demo I felt that the paper I was about to use to print the mezzotint had dried out a bit so I re wet it with a hand water mister, blotted it and the printed it. To get a good impression from a mezzotint I turn my pressure dials all the way down in order to achieve maximum pressure.

One thing you could do is to run the uninked etched plate through the press on dampened paper and if you see the etched lines in relief on the paper you know you have enough pressure.

What ink do you use?

I have been using Gamblin Portland Black for many years and in my opinion it is the best American made ink. However I sometimes use Graphic Chemical 514 Black etching ink, a less expensive ink, for printing etchings that have a lot of different tones of aquatint. This is because this ink has extender or transparent base in it and then the print will show all the differences in the subtle tones of aquatint. The stronger and more opaque Gamblin ink does not show the clear differences between the tones. I often mix 50/50 the Gamblin and Graphic ink together to achieve the correct balance that will give the best print.

Which ink did you use for printing Somerset with a spoon?

When I teach in a place that has limited ventilation I use ink that can be cleaned up with a mixture of water and dawn dishwashing detergent and so for printing monotypes on Somerset with a spoon I use Cranfield Caligo Safe Wash relief inks. I buy mine from Renaissance Graphic Arts.

Which method would you recommend for an absolute beginner?

For an absolute beginner take an evening or weekend class at an open access printmaking studio especially if you want to make an etching because that involves acids the use of which has to be demonstrated by a professional who is teaching the workshop. Non acid techniques that can be done at home include mezzotint and drypoint. Then you need to take the plates  to where you can access an etching press.

Did this in high school but would love to go to a course extensive! Where could I go for an extensive workshop and then invest in a small press?

(See answer above). You could also google Printmaking workshops in their area. A local art school or University art department might be offering non credit adult evening classes. One thing to do is to call Renaissance Graphic Arts and tell them where you live and that you want to take some printmaking classes. Ask them if they have schools or printmaking classes in your geographic area to which they sell printmaking supplies to. Of course this customer would have to be a place that offers classes and not an individual artist working out of their own studio.

How many prints on average can you pull from a copper plate mezzotints?

An artist can spend days and even weeks working on a mezzotint plate. The plate can only be printed about six times before the lightest tones become lighter through the abrasive action of wiping the plate and the pressure of the press. That would be very unfortunate. Therefore the plate has to be "steel faced". This coating of infinitesimal thin steel  protects the image on the plate from wearing out. This coating itself does not in any way affect the quality of the print. If a mezzotint is plated this way one can print as many as 50 to 60 without any decline in quality. At any time the plating shows a sign of wearing off ( you will see the copper beginning to show through, then the plate should be re-steelfaced. From the webinar you will have noticed that I use the softer tulle fabric to wipe the plate instead of the more abrasive tarlatan.

View more ‘For the Love of Art’ Webinars on our YouTube Channel.

Register for Upcoming Webinars!

The Beauty of Engraving

Have to hand it to Neenah Paper for knocking it out of the park on this one.  They created this site that educates on the history of engraving, features gorgeous engraved work, and has a killer video showing the process.  Worth exploring.

Many of the projects in their gallery were done on Lettra.  

Check out the three dozen other papers we recommend for engraving (or other intaglio processes.)